Pages

Wednesday, December 19, 2012

Design Team Wednesday

Hi Everyone! With Christmas right around the corner the days are much shorter, the nights are much cooler and the possibility of snow is on the horizon.  When I saw the We Are Memory Keepers "Frost" line I just knew it would be a great way to welcome in winter. One of the things I love about this line are the vibrant colors.  A lot of winter lines tend to be a bit dull, using mostly shades of blues and grays.  But the Frost line has a gorgeous blend of blues, grays, and greens. The first project I made was a paper wreath.  I used four 12x12 sheets of paper from the Frost line.  Another thing I love is this paper is double sided so I was able to get a lot of paper choices from my paper strips.  Here is the finished product:

All of the pattern paper is from the Frost line.  The "Winter Time" embellishment is from the Frost line as well. I pulled the center together using a piece of Bazzill ribbon and a piece of blue Bazzill cardstock. 
I just love how these simple loops of paper can make such a fun decorative wreath.  The paper tabs are attached using hot glue and a Styrofoam wreath. I couldn't believe how easy this was to make and fun too!

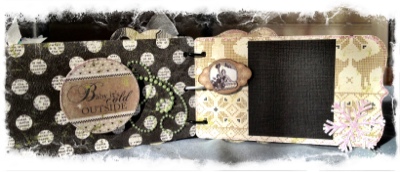
My second project was a coordinating layout.  My daughter was born in the winter months and I loved that this paper was neither masculine nor feminine.  It really could go with either gender. 
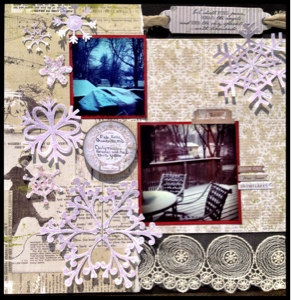
This is a photo of my dear daughter bundled up in her winter sleep sack and cozy little hat.  The pattern paper is from the Frost line and the cute polar bears at the bottom are from Queen and Co. The pom pom ribbon is from Maya Roads.  I used a fun piece of glitter cardstock to really tie in the idea of winter. I also used glitter letters from my stash for the title. Here are a few more close up pictures!


I hope you enjoyed my projects and are looking forward to a peaceful winter full of that powdery, snowy goodness! Happy Scrappin!


Thursday, December 13, 2012

Employee Favorite Product of the Week!


Liquitex light modeling paste

Liquitex light modeling paste was designed to be mixed with acrylic paints so artists can add texture to their work.

BUT…I don’t use it that way. BECAUSE…I am NO artist! LOL.

I used the paste with stencils!

The card was made using a metal stencil. Using my craft mat, I taped the stencil edges to the paper IMPORTANT: Use heavy weight paper. With my spatula, I scooped some paste from the container, and plopped it on the top portion of the stencil. And just like frosting a cake, using the spatula at 45degree angle, gaps.

Carefully remove stencil, and lightly sprinkle some fine glitter over the paste. Heat set with your embossing heat tool. Be careful not to burn the paper. OR, you can allow to dry overnight. The paste hardens overnight. I happen to like how the paste bubbles with heat set. I smash the bubbles with my fingers and create a cool texture. Heat set only dries the paste to the touch, but it is still soft…However, the drying process is faster with the heat set.

For the Christmas House, I used a flexible “masking” stencil for the brick work. After the same process as above, I used distress markers to color in the brick, and free handed the roof top.

Other coloring mediums include acrylic paint, copic markers, ink stains, dabber paints, and ink pads. A little experimentation is all“it takes.

So, don’t throw away those metal stencils. Try using the modeling paste, and have some fun!

Pat

Wednesday, December 12, 2012

Design Team Wednesday

Hey everyone! I can't believe that Christmas is just around the corner. Somehow I'm still stuck in fall mode, but I definitely started getting in the Christmas spirit while making my projects this week! I found a picture of my husband and I at my in-law's house a couple years ago for Christmas. This was a very special Christmas for us because we were able to have both my family and his family together for Christmas dinner. For my layout, I wanted to mix and match different paper styles to create a unique combination. I used Jenni Bowlin's "Christmas 2012" paper, which had a nice vintage look to it, as the background and combined it with Echo Park's "Very Merry Christmas" paper, a very fun and modern paper collection. I used my die cut to create the cute design on the bottom of the red paper, and I laced green and white twine through to give it more dimension. I added ribbon from American Craft's "Holiday Ribbon" between the two center papers to give a nice "page break."  To accent the page, I decided to make paper ornaments. Using my die cut, I cut out different sized circles and embellished them with Stickles and glitter from my stash. I used dimensionals to make them pop, attached them with twine, and "hung" them with a brad. The stars are actually from a chipboard tree set that I got at the store. One of the trees had stars on it, so I punched them out and colored over them with red, green, and gold colored pencils. The sentiment "Joy" is from Echo Park's "Christmas This and That" chipboard set. Here's some pictures of the layout.


Here's a close up of the paper and one of the ornaments.


When I was at the store, I saw the chipboard tree set and just had to buy it! I had been debating on what to do them, and I finally decided to make napkin holders with them. Since this time of year usually consists of many dinners and parties, I thought that this would be an easy way to embellish a dinner table. With my leftover paper, I covered the trees both front and back, embellished the center with the Echo Park chipboard sentiments, and added ribbon from my stash to the top. For the "rings,", I used 2 inch wooden rings and wrapped them ribbon. I hot glued them to the back of my tree, and VOILA! I had 4 cute napkin holders. This is so easy to make, and they really turn out nice.


Here's a close up of one:


This is how the back looks like:

For a better look, stop by the store and check them out along with the layout. Happy Crafting!

-Claudia 

Thursday, December 6, 2012

Employee Product Of The Week

Oops!!  How did it become Thursday already?  This should have been posted this morning, but I was thinking it was only Wednesday today!!  This is Dawn and it is my turn for employee product of the week.  Anyone that knows me, knows that I am not really a big technique person, but as I was entering this fabulous product into the system the other week, my curiosity got the better of me!  I caved and bought the Naturally Aged Paint System Precious Stone in the color turquoise by Tattered Angels.  It is a 4 step process, but it is really easy to achieve beautiful results.  I used glossy paper, but it will work on almost any surface.  I followed the easy instructions and let it dry and then I die cut my Christmas tree and made a card (of course, lol.)  The photo doesn't do the effect it creates justice.  You can't see the true colors and shimmer.  The colors can be used alone or layered for truly custom effects.  Each time you use this product, you will achieve different results.

This product also comes in other beautiful colors and finishes like weathered wood, antique silver or aged copper, just to name a few.  Stop by the store to see my sample and to pick one of these fun unique kits up for yourself.  You won't be disappointed!


Sorry about the poor quality photo's.

Special Sales in the Store

Lifestyle Crafts Dies & Alphabets 25% off the already discounted price
(excludes tools & Knotty & Nice)


Knotty & Nice $39.99

Lifestyle Crafts Letterpress 25% off (excludes tools)

Clearance Paper 10 for $1.00 (Must be in increments of 10)

QuicKutz Clearance take an additoinal 50% off

American Crafts Ribbon by the Yard 40% (only though December 14.

Select Class Kits marked down.

Some exclusions apply. Sale prices apply to regular priced and in-stock merchandise. Cannot be combined with any other discounts. Not good on previous purchases or towards class kits. Sales good now through December 31, 2012


Wednesday, December 5, 2012

Lifestyle Crafts' Evolution Now in Stock!

Evolution


The Evolution universal craft tool allows you to die cut, emboss, and letterpress! It's lightweight, portable, and compatible with all leading brand dies and embossing folders. This tool is perfect for scrapbooking, card making, home decor, and all craft projects!

Includes:

- Evolution tool
- Large 6x13" Cutting/embossing platform
- Mat A for cutting thin metal dies
- Mat B for cutting thick metal dies and embossing
- Bonus Nesting die ($24.99 value!)

Thursday, November 29, 2012

Employee Favorite Product of the Week!

Hi there!  Lori here to tell you about Knock Out Punches by American Crafts.  After we got them in at the store and I had a chance to play with them I knew this was an item I had to have.  First of all, it's a great value.  You are getting 6 border punches for about $8.00 a piece.  If you have spent anytime talking to me at the store you know I have a pretty tight crafting budget so I want to get a lot of bang for my buck.  This really delivers that.  It also has a really cool carry case that keeps it all together.  I always throw it in when packing for a crop because it gives me lots of options without having to take up a ton of space in my crop bags.  I bring enough stuff with me already.  I'm sure you all can relate to that :) happy  Right now at the store we have two different sets of everyday punches and a really cool Christmas set.  Come by and pick up a set to you from Santa! 

Wednesday, November 28, 2012

Design Team: Merry Banner with October Afternoon

New this week at Scrapdoodles is the new Christmas line from October Afternoon, "Make It Merry."  Oh My Goodness, go check it out!  This line is so fun and adorable.  It's full of vintage card images and patterns.  There are so many cute little elements such as flashcards and postcards, greeting card sentiments and more.  I love the music sheet and was inspired to make this simple and sweet banner with the song sheet as the base. 

I cut letters from the patterned papers with my die cut machine and layered on the coordinating elements like the ticket stubs and sweet vintage images, some I hand cut from the papers and cards.  The "Miscellany" pack also includes buttons and ribbon.  I added some old red doilies to the top, some red and white twine, fringe, and glitter from my own stash.  The elements are easy and fun to mix and match and layer.  Here's a few close-ups.  You'll be able to see it in person if you stop by the store (starting Thursday).


Some of the elements will be perfect to include as journaling spots or extra page inserts in my December Daily.  I prepped a few to see how they would work out (and they are just too fun to play with I didn't want to put them away yet :))  I'm sure I'll be pulling from these pieces throughout the month.  Also available are buttons, chipboard, postcards (unless I get to the store first) and more!
Lastly, I pulled several elements together to make this super sweet layout of a photo of my younger sister and me in 1978.  I would hardly call us vintage, but these fun papers really compliment the black and white (okay and a teeny bit old) photo. 
Hope you've been inspired!  Happy Crafting - Karen

Saturday, November 24, 2012

Small Business Saturday Specials!

Today Only! Ranger and Tim Holtz Products are 15% off!* Adhesive 20% off (limit of 10, mix & match)* *Must be in stock and no other discounts apply. Specials below are through tomorrow! Unibind Photobook Creator $59.99 (MSRP $99.99) Make a book just like the professionals at Kodak do! All Unibind products are 30% off this weekend only! Sihouette Specials Silhouette Vinyl & Transfer Adhesive 30% off Silhouette Starter Kits 30% off Silhouette Rhinestones 30% off Silhouette Sticky Back Paper Packs 30% off American Crafts' Specials Take 20% off American Crafts Extreme Value Packs! Includes Chromatics, Knock-Outs Punch Systems, WOW! Glitter Set, Pen & Markers Sets, Gel Pen Set, Snow Days Paper Pad. Extreme Value Ribbon & Storage $14.99 Lifestyle Crafts Lifestyle Crafts dies & Alphabets & Gift Sets (excludes Knotty & Nice) 40% off marked price! (remember they are already 10% off MSRP!) Letterpress (inks, papers, templates) 40% off Cardstock 8.5 x 11 cardstock (excluding whites, creams, blacks, reds & Kraft) 10 for $1.00 Lucky 8 Punches All Lucky 8 Punches 25% off Additional Savings! Storage 40% off (excludes Cropper Hopper & Mackinac Moon) Store Value Packs 50% off Take an additional 75% off clearance (Excludes QuicKutz) Take an additional 75% off Making Memories Slice line Take an additional 50% off clearance QuicKutz. **All sales apply to regular priced and instock product only. While supplies last. Sale ends Sunday, November 25, 2012.

Wednesday, November 21, 2012

Design Team Wednesday-Tis the Season

Design Team Wednesday-Tis the Season
Little Yellow Bicycle's Once Upon A Christmas caught my eye immediately. I fell in love with the somewhat vintage look of the collection. I have been passionate about Christmas and everything it embodies ever since I was a little girl. It was a gift in and of itself to use this collection to scrapbook some of my favorite Christmas photos of my children.
For this layout I incorporated several of the patterned papers from this collection as well as the embellishments, including the title and star. I opted to glittter the trees and reindeer antlers and use a brad in the center of the star to continue the reindeer theme.
For my second project, I created an ornament chipboard album. I felt like a child on Christmas morning making this! I incorporated numerous embellishments from the collection as well as the patterened papers. I did add a few embellishments from my supplies including the flowers, ribbon, and brads. And of course I added a fair amount of Stickles, my latest scrapbook obsession.


Stop by Scrapdoodles to see these projects in person and to peruse the entire chipboard album! Happy Holidays to everyone and remember to capture all your memories!

This Holiday Season...

Happy Thanksgiving!!!

We wish you the happiest of Thanksgivings!

Please note that we will be closing today at 5pm to get ready for Black Friday and Small Business Saturday. We have some awesome specials for you!

We will be open on Friday and Saturday from 10am to 9pm.

Tuesday, November 20, 2012

Easy Frame Project

Have you seen these unfinished chunky frames by Basic Grey?  Scrapdoodles carries them and they are so fun to cover with your favorite papers.  On this one, I chose a couple of sheets of the Pink Paislee City Sidewalks collection (gorgeous!).  One of the sheets features lots of circles af varying patterns and colors, so I used my circle punch to punch them out.  I brushed a bit of glue onto the edge of each circle and dipped them in fine green glitter.  Then I layered and just slightly overlapped them on the bottom half of the frame.  I used a small square of paper to create the rolled paper flower, again brushing with glue and adding the glitter and just a few embellishments from the collection.  Inside the frame I just added more of the paper embellishments, but wouldn't this make a cute gift with a photo of your family or favorite little
person (or pet)?  It was quick and easy and the possibilities are endless!  Stop on in the store this weekend to see it in person and pick out your favorite papers for your own project.

Happy Thanksgiving from Scrapdoodles Design Team!

Friday, November 16, 2012

Christmas Card Extravaganza!

Hello!

Dawn and I are teaming up for a fun day of card making! We will be making eight cards during class and if you want to order more, you'll be able to order extras! Here are our samples:


Here are the class details:

Christmas Card Extravaganza
with Dawn and Tessa

Saturday, December 8th at 11:00am
$24.00
Please bring your basic supplies- adhesive, scissors, bone folder, a pencil


For anyone taking the class, we will also be selling kits of 5 cards (one design) for $10.00 in case you would like to make more of a certain design. We will be starting at 11:00 am but you are welcome to stay into the evening making cards! We will have our stations set up throughout the day.

To sign up, please stop by or call the store today! Make sure to let them know if you would like any extra cards and of which designs.

Hope to see you there! It should be a great day of cardmaking!

-Tessa

Thursday, November 15, 2012

Employee Favorite Product of the Week


Tiny Attacher


I love my Tiny Attacher - or as my friend calls it my "stupid little stapler". When I first bought it she said - it's just a little stapler, why spend that money on something you can get for 5 bucks at an office store? But then at a crop she asked me to borrow it .... then asked again.... and again.... after the 10th time she smiled at me and said - hey can I borrow your stupid little stapler again? with a smile on her face.

I like it because first of all the staples are little and cute ;) But also the stapler has an easy one handed grip - so you can hold your project with one hand and staple with the other. The stapler also has a long reach compared to most small staplers. Lastly it is also a great way to adhere things when adhesives either aren't practical or won't look right.

Ideas for using the Tiny Attacher: Staple accordian folded piece of paper when making rosettes, staple bits of ribbon or paper to layouts/tags, use staples as a vellum adhesive, staple to adhere ribbon - whether flat or scrunched up. Staple ephemera, journaling boxes, embellishments - just anything that you need to attach!!!
Michele

Wednesday, November 14, 2012

Design Team Wednesday

With all the cold weather lately, I have gotten into the winter spirit.  Plus Authentique created this beautiful collection Peaceful, that inspired me! The collection is so me, very shabby chic!!! The colors are neutral: beige, cream, black and a just a little green.  The possibilities are endless with the colors being neutral.


My first project was a mini album.  I used my Cameo to cut out the pages and the snow flakes. I embellished the snow flakes with Stickles Crystal glitter and Stampendous's Shaved Ice.  Now let me warn you about the Shaved Ice...it's not for those of you who are neat freaks! I have shaved ice all over my house right now and probably will until after the holidays. LOL!  I used the sticker sheet from the paper collection, some chipboard and foam tape to make little embellishments.


My next project was super fun!! I took a wooden sled, painted, inked and junked it up! I love altering wood objects, in case you haven't noticed yet with all my projects.  You really need to come by the store to see the sled up close. I don't think the pictures do it justice.  I used the Peaceful collection again, Stampendous's Shaved Ice and Shabby Chic Embossing Enamel.  I used the Cameo to cut out the letters. Next, I used the embossing enamel on them and finally to add some color and weathered look I inked with Fire Brick Distressing Ink.  I took off the boring rope at the front of the sled and replaced it with the really cute green ribbon from Webster's Pages.  I love Webster's Pages ribbon!! You can say I have an addiction to it.  Just ask the girls at the store. I have to have it all when it comes in so you better buy some before I hoard it all. :)


My final project is a layout. I used all the products above and used some more YUMMY Webster's  Pages Cream Lace.  This lace is absolutely beautiful!!! You only need to add a little to any project to add the extra elegance and shabby look.


I know we may all not be super excited about snow, but I hope I have inspired you with this beautiful collection from Authenique to create something wintery beautiful.

~Have a wonderful Thanksgiving holiday~

~Tiffany

Monday, November 12, 2012

Christmas House Trio Class

I'm a little late posting to the blog but here are some peeks of the Christmas houses that I made for next weekend's class:


There are still a few spots left in the class if you'd like to join us! Here are the details:

Christmas House Trio Class
with Tessa

Saturday, November 17th at 1:30pm
Cost: $20.00
Supplies needed: scissors, trimmer, pencil, adhesive

Please call or stop by the store to sign up!

Thursday, November 8, 2012

Employee Favorite Product of the Week!

Twine! So simple and inexpensive what is not to love! Scrapdoodles has plenty of color choices by the spool or by the yard we can get you stocked up! We have all see it used to wrap pictures or add a little something to a card by wrapping it and adding a bow. Another favorite is to make a banner with twine or attach a button with it. How about sewing a border with some fun colorful twine or using it to hang an embellishment like my fish. Snaz up your celebration page with balloons using twine as the string. I had fun making my own embellishment with twine for my bowling page. I really could have gone crazy with that one...I was thinking a snowman would have been super cute using that same idea! One of my favorite ideas I saw online was a title written in cursive using twine. You really can go on and on with clever uses for twine and we are here to help get you started! Hope to see you in the store soon!

~Susanne


Wednesday, November 7, 2012

Consignment Sale this Weekend!

Today is the last day to drop off your consignment sale items!

Sale starts 10am on Friday, Nov. 9 and goes through 4pm on Mon., Nov. 12.

On Monday consignment items are 50% off unless marked by a red star. Don't miss your chance for some great bargains!

Design Team Wednesday..... Heidi Swapp

I created this shadow box using the new Heidi Swapp papers available in the store now.


I was instantly drawn to the colors and versatility of this paper. The colors are rich
and vibrant. I used an Altered Art Matchbook Box from Graphic 45 and covered it with
Heidi Swapp papers. I cut out the flower using my silhouette. The broach on the paper flower is a Couture Accent. When making flowers, make sure that you add lots of layers and use an embossing tool to get depth.


I layered the inside with a cut from the silhoutte and also popped up the pictures and the clock.
I also created the tag below using the Heidi Swapp papers.


One of my favorite things to do in scrapbooking is stacking and creating textures.  I do this alot by adding fabric to my projects and pages. I usually use sheer fabrics so that you can still see the paper beneath. To use fabric in your scrapbooking, I just use an aerosol spray glue and spray the fabric. I use a brayer to
place the fabric on the paper. If you make a mistake, it is easy to just pull the fabric up and replace it without spraying it again. I don't always put my fabric down perfectly because I like the different textures that I get. After laying down the fabric on my tag, I sprayed it with perfect pearls. I love to print on fabric from my printer and fabric is also easily stamped. 

Hope you enjoy!!

--Carey