Pages

Wednesday, August 28, 2013

Design Team Wednesday featuring Jillibean Soup

 
Hello everyone! I have to apologize for being a little late with this post today. With the kids back in school, my mind has been a bit busy. At any rate, I am very excited to share my layouts using the Jillibean Soup collection: Happy Camper Stew. This collection is adorable and could not suit me better as we are campers!
 
This first layout features the darling camper themed patterned paper as well as the pea pod parts die cut cardstock shapes. I could not resist using the flamingo which coordinated perfectly with my daughter's bathing suit. The title is taken from one of the patterned papers which includes numerous titles, phrases, etc.  

I added a bit more embellishment using buttons from my stash and pop dots to raise various elements of the page.


This second layout features patterned paper with a more woodsy feel. It coordinated perfect with the title and s'mores pictures. The trees and adorable squirrel are also die cuts from the collection.


To add a little texture, I used brads from my collection and again incorporated pop dots.
 
 
I hope you have enjoyed these layouts and feel inspired to scrapbook some of your favorite summer memories. Stop by Scrapdoodles to see these in person and pick up the Happy Camper Stew collection by Jillibean Soup.


September Card Class With Dawn

Hi, anyone else wondering where the summer has gone?  How can it be almost Labor Day already??  Seriously!!

Anyway, I have a couple of sneaks at the cards we will be making in my September card class.  We will be playing with gelato's again, doing some simple water coloring and emboss resist techniques with them.  We will also be making a couple of neat little flowers.  My Wednesday class is full already, but I have spaces available in my Saturday September 21st class.  Call the store at 540 548-3788 to sign up or stop by in person.

Details:  Wednesday Sept 11th @ 10.30am (full)
                Saturday Sept 21st @ 10.30 am
                Price:  $15.00


supplies:
basic kit (trimmer, adhesive, scissors etc)
paint brush, water cup, craft mat, liquid glue, needle and thread
(no sewing skills required, lol!) baby wipes or soft cloth
corner rounder, pop dots, scallop border punch,
mini stapler, double sided tape, pinking shears
 
I look forward to seeing you in class :)
 
Dawn
 

Wednesday, August 21, 2013

Design Team Wednesday - Bella Blvd!

Hi Everyone! It's Karen here for Design Team Wednesday and I have some super fun layouts to share with you!  Bella Blvd is moving up as one of my favorite lines with their recent releases.  Whether you enjoy scrapbooking, cardmaking, or general paper crafting, you'll want to check out these new lines: Snapshots, Daily Chevies, and Playdate.  I just saw that they also released their Halloween line (oh the owls!) and it's already at the store.  Check out their summer release catalog for more inspiration and then hop on into the store to get your hands on these fun collections!  They are sure to inspire creativity.

Today, I'm sharing 3 layouts I created with the Snapshots line - I love the playful elements in this line, especially the doodling and the cameras.  The little camera icons in the papers are too cute and I couldn't wait to get them home from the store to play with them.  For this first layout I layered lots of elements creating a bit of a playful and colorful design.  It's actually a bit on the busy side for my usual style, but I couldn't stop adding elements - too much fun!  Several pieces were cut from the sheet of border strips.  The doodle card was also from a full 12x12 sheet of project life style cards and I colored in some of the doodles using my watercolor pencils. Another fun element on my layout is simply turning over one corner - see it in the upper right - and using that area for another cluster of embellishments.
Below my photo, I cut a row of cameras and then fussy cut a few of them to pop off the page using foam dots.  This is another fun technique to try on your next layout.

I really like the use of black alongside the bright colors - and for my next layout I emphasized the lime green and offset it with some of those black elements. 
 Again, I had fun playing with some of those cute cameras!
By this time I was running out of papers- I had only picked up 4 sheets plus some die cuts and stickers (have to go back for more, oh darn), but had enough to pull this last layout together.  I think the fun papers are perfect for this fun and silly photo of my husband and me.
I hope you've been inspired to check out this line and more from Bella Blvd.  You won't be disappointed and I can't wait to see what you create!  See you at Scrapdoodles ~ Karen

Thursday, August 15, 2013

Employee Favorite of the Week - Heat it Craft Tool

Staying with my art journaling theme, one of my favorite tools is the Heat It Craft Tool from Ranger. This heating tool was specifically designed for speed and quietness! You can talk and have a conversation while several are in use!!! It is perfect for embossing powders, heat setting inks, drying paint and shrink plastic!!! (Speaking of shrink plastic, we have planned the cutest Christmas ornament class this fall).

This is also the heat it tool that Donna Downey highly recommends in her classes (allows her to teach while you are drying your projects :)


Heat it™ Craft Tool


Perfect for heat embossing Stampendous' Chunky Embossing Powder.


The heat tool was used in the Ranger class to dry the water color paper and the paint on the black plastic sticker numbers. 
Enjoy,
Cheryl

Wednesday, August 14, 2013

BasicGrey Page of the Month for August


This kit includes acetate alphas, metal tabs, snippets, an exclusive sheet of red alpha letters and 5 different papers (2 of each) from the Carte Postale collection.


Student Supplies: Adhesive, 24" orange twine, paper trimmer, pop dots, scissors, ruler, 1 1/2" circle punch, 2" scalloped punch, notebook punch, corner rounder, black journaling pen and distressing ink. (I have the punches needed for the class to share)

Date: Tuesday, August 20
Time: 5:30 pm
Fee: $25
Instructor: Cheryl

Design Team Wednesday - We R Memory Keepers with Suzanna

One of the latest CHA releases by We R Memory Keepers is the Chalkboard line. In keeping with the chalkboard trend, they really did an amazing job with the design and coordinating colors. I have a couple of projects to share with you today using this collection.

First up, I have a gift box to share with you. I was fortunate to see the demonstration of this awesome new gift box punch board in action while in Vegas for CHA. I was even more fortunate to have it personally demonstrated for me using this very piece of the Chalkboard line for me to bring home and use for my blog post today!!
 
Once finished, the box is simple to decorate with the coordinating papers and embellishments from the Chalkboard collection. A few cuts from your Silhouette to make the bow and a stunning gift box is ready for your next gift giving surprise!

Two little slits through the heart for the lollipop stick, AKA arrow, make an adorable embellishment for added pizzaz.
  
Have some of those Project Life cards but don't know what else to do with them? Use them on a layout! They don't have to be used exclusively for the PL page protectors. Break out of the box (ha ha!) and find another use for them as I did on this 8.5x11 layout!

I used two of the 4x3 cards and a larger 4x6 card on this layout. A 12x12 sheet trimmed to size for the background and some stickers and doodling make a simple yet detailed layout. See the white tag behind the picture? The heart on my box came from inside that! Love when you can use things more than once and for multiple purposes!
Personalize the cards and make them your own. I wanted the teal journal card to stand out a bit so I used my pen to add black dots all the way around the inside of the scallop. Makes a big difference, don't you think?
A simple button and thread to tie things off!

The Chalkboard collection by We R Memory Keepers is a must have chalk collection! Be sure to stop by Scrapdoodles and grab some before the shelves are bare! Watch out for the new punch boards by WRMK, they should be arriving any day now!! Thanks for stopping by the blog and be sure to stop in the store and check out all the stunning product arriving daily from Create n Connect (AKA CHA)!!

Monday, August 12, 2013

Summer Love- Mini Album Class

        Sept. 4th 11am-1pm  or Sept. 7 1:30-3:30pm

Summer is made for memories. Now that the kids are almost back in school, this is the perfect time to capture those awesome summer memories you just made. This 8x8 album has 8 chipboard pages (20 sides) with pockets, tags and envelopes for plenty of photos, journaling, postcards, tickets & mementos. Chalkboard is hot right now and perfect for a great summer album. Customize the chalkboard Polaroid cover with your last name and year or the chalkboard paper with your own journaling & doodles. This class includes binder album, pre-cut patterned papers, designer brads, chipboard, letter stickers, customizable chalkboard Polaroid cover, fishing net, starfish, popsicle stick, bakers twine, cardstock, stickers, envelopes, pockets, tags, a hanger and tons of leftover embellishments. Everything shown in the sample and detailed directions with color photographs is included in this class. The product alone to create this album would cost more than $60, so this class is a great value. There is also an option to purchase as a kit. Registration for this class is limited, so sign up now. Class or kit= $50. Check out a few of the sample pages below or visit the store to see it in person.


What to bring:
Detail scissors, dry adhesive, strong wet adhesive for chipboard such as Helmar 450, Zip Dry, Beacon 3 & 1, as well as plenty of 3D adhesive such as foam tape, pop dots or foam squares. Brown or black ink, corner rounder, paper piercer, Crop-a-Dile and paper trimmer.
 

Cards & Copics...

Hello my Scrapdoodles buddies!
Hope you've all had a chance to squeeze in some "scrappy-time!"  I know I have!!! I found myself in a card-making roll!  I was in a Copics coloring mood 'cause I had just picked up a few things from the store.  And actually the one purchase that really got me going was my E000 Pale Fruit Pink Copic Refill!!! Woohoo!!!  Since I use this color as a base for almost every skin tone, I go through quite a bit of it!  Michele suggested the refills, and was happy to take my order.
Since I use this color as a base for almost every skin tone, I go through quite a bit of it!  Michele suggested the refills, and was happy to take my order.  Before I knew it, I had put together several random cards, and here they are:


Well my friends, that's all for now.  I hope you enjoyed the cards, and thank you so much for visiting our blog.  We'd love it if you left of a comment... we love hearing your thoughts and idea!  If you get a chance to do some Copic coloring of your own, please share it with us on our Facebook page, we'd love to see it!! If you haven't started coloring yet... what are you waiting for???

Here's your chance:
Sept 14 (Sat) 1:30pm COPIC Basics Learn all about COPICs and the basic techniques for coloring. Includes 3 markers. Please bring note taking materials. $35 w/Cheryl

And just so you know, this is the exact class I took when I started just a couple of years ago!  So I talking from experience my fellow crafters, this class was tons of fun and the instructor (Cheryl) was excellent! You will love it!

Happy Scrapping and Big Hugs,


Yvonne 


Saturday, August 10, 2013

My School Days Memory Box - Kids Class

Hi everyone, it's Rachael, and I'd like to invite all you kids, and kids at heart, to join me for my final kids class of the summer.  We are going to be making a School Days Memory Box.  This project was once again inspired by my children.  My kids, particularly my son, love boxes.  He currently has five or six boxes  holding various treasures in his room. 

Last year was the first year all three of my children attended school, and I really wasn't prepared for the shear amount of "stuff" that entailed.  Valentines day cards, tooth certificates, teddy bear picnic ribbons, and countless other precious momentos that seemed to pile up around the house.  With this in mind I decided to create these memory boxes for each of my children to organize all of their keepsakes for the upcoming school year. 


I am offering a color palette for boys and girls, because I just couldn't resist the coordinating My Minds Eye Kate and Co. paper.  Each child will also be able to label the front of the box with their name, the school year, and their grade for that year.  These boxes will fit nicely on their closet shelves for easy storage and access.


I hope you can join me on Thursday, August 22nd at 10:30 a.m. for this fun class.  The cost of the class is $15, and kits will be available.  You can call Scrapdoodles to sign-up, or stop in and take a look at the boxes in person, my pictures don't do them justice.  When you sign up please be sure to choose either the boy or girl color scheme,  provide the name of the child, and the grade they will be in for the 2013-2014 school year.  Happy Crafting!

Thursday, August 8, 2013

Renee's Project of the Week Featuring Tim Holtz Products!

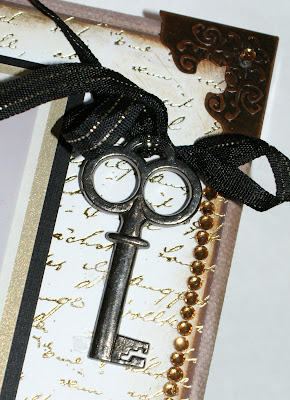
This week Renee created a beautiful canvas to share!  She created it using some great products by Tim Holtz- she also wrote up instructions!  Thanks Renee!  Here is her project:


Available In-Store Materials:

6x6 canvas
Ink:  Tim Holtz Distress Walnut Stain, Distress Vintage Photo
Paper:  Penny Black Script Foil White #60-005
Metal:  Tim Holtz Ideology Corners
Lace:  Webster’s Pages Trim & Ribbons in Gold Lace
Paper Flowers:  Kaiser Craft Paper Blooms
Pop Dots

Personal Stash:

Key:  Although Tim Holtz has amazing keys, this particular one has been in my drawer ‘forever’
Black/Gold Ribbon:   Used to tie key is a remnant from my fabric bin
Black Velvet Ribbon:  Used on left side of canvas over lace is a remnant
Bling:  Not sure of its origins but Kaiser Craft makes similar items

Instructions:

The great thing about canvas projects is that they can be themed.  Mine is a wedding theme, but I have done similar projects for Back to School, Father’s Day, and Baby Announcements.  The important thing is to decide on the image, select complementary colors and an overall color palette.  For this project my color palette was white, gold, and brown with hints of black.

1.     Take 6x6 canvas and ink sides.  I used Distress Vintage Photo ink for the sides of the canvas.  Where the sides meet the top I used an extra ‘swipe’ of Distress Walnut Stain to darken the effect.  Let dry – but it shouldn’t take too long because you are not saturating canvas, just ‘swiping.’
2.     Cut paper approximately 5.75” square.
3.     Ink edges of paper with Distress Walnut Stain and use your favorite adhesive to adhere paper to canvas.
4.     Measure your lace before you cut – if you wish to achieve the wavy effect I used in my project, you will need to cut more than 6” of lace. Practice before you cut.  The amount of lace will be determined by how much wave you would like to achieve. 
a.     The lace I selected was wide so I cut it down the middle.  The idea of the lace is to enhance your project, not overtake it.
b.     You do not need to create folds; my personal preference is to create as much texture as possible so the wavy effect appeals to me.  You could simply lay your lace straight across the canvas.
c.      Tip:  If you sew, you could run a wide stitch (gathering stitch) and pull gently to create a ruffle.
5.     Once you have cut the required amount of lace, take gold lace ribbon and use your fingers to create waves/folds along left border.  Working in small sections use your favorite adhesive to attach each section of lace to the paper. 
a.     Tip:  Be sure to wrap your lace around the top and bottom of the canvas sides to create a finished look.
6.     Cut velvet ribbon approximately 7.75” and adhere with your favorite adhesive to the gold lace. 
a.     I used the black velvet ribbon because I had cut the gold lace in half to achieve my desired effect – however, this produced a rough edge.  The black velvet ribbon nicely covered the unfinished edge. 
7.     Place a Tim Holtz Ideology corner on each corner of your canvas.  There are three different metal color tones in each package, select the one that works best for your color palette.  Adhere with a strong adhesive, I used book binding glue.  For the corners with the lace/ribbon you may wish to use a large ‘gator clip’ to ensure strong adhesion.
8.     Photo – I like to use multiple mattes.  Attach the photo onto a white matte and then a gold tone matte.  Before I attached the photo and white/gold mattes to the black matte I used Pop Dots to create dimension.  I then attached the photo/mattes to the canvas, slightly under the gold lace.
9.     Kaiser Craft Paper Flowers – I used five flowers to ‘corner’ my photo.  I like to work in odd numbers for art projects and three wasn’t enough and seven was too much.  Again, personal preference – choose what works for you.
10.   Key – Tie a small ribbon around your key and depending on the weight of the key use an appropriate glue medium.  Make sure your ribbon bow has enough fabric to gently flow over the canvas.

11.   Bling – I used a bling string along the right edge of the paper.  Close to the inked edge, but not covering it.  I took a couple of stray bling jewels and placed one on each Ideology corner to tie the look together.

Wednesday, August 7, 2013

Design Team Wednesday - G45 Steampunk Spells with Yvonne

Hello my Scrapdoodles friends,

Hope your summer is going well!

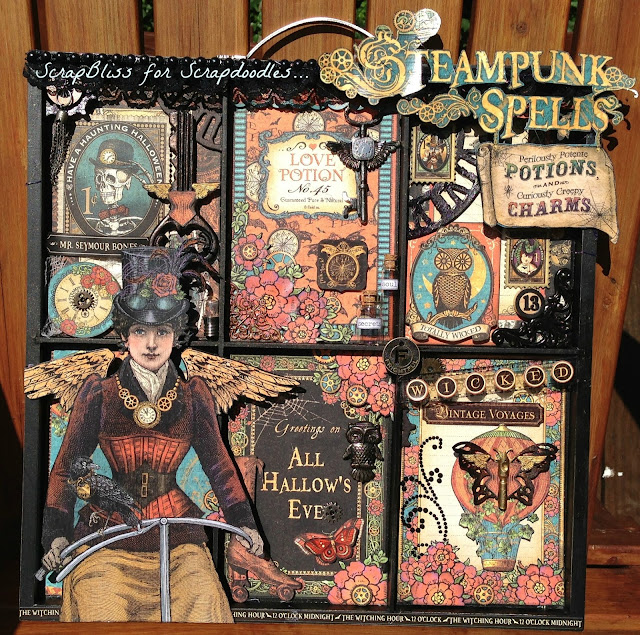
Today I want to share a couple of projects featuring the "Steampunk Spells" collection from Graphic 45.  I know, I know, it's way too early for Halloween... but with paper this rich, and this vibrant, you have no choice but to throw caution to the wind, and just jump right in!!!  That, plus the fact that soon the new CHA releases will be rolling in and well, we just have to keep up! Don't we??  Heehee!!

The first project is an Altered Printer's Tray...
Here are a few close up shots, so we could better, and more fully appreciate the artistry, and the depth of color that is customary in every G45 collection.


The second project is a mini-album...


I had a ton of fun making my anticipatory Halloween projects... and since I actually saw quite a few fall holiday displays while I was shopping this week, I won't feel too bad about my promptitude!  Hopefully,  while YOU guys are out shopping this week, you'll pop into Scrapdoodles, and say hello to all of the lovely staff members.  They'll be happy to point out all of the G45 goodness just waiting for you and your crafty hands.  While you're there, don't forget to take a quick peek of the projects in person. The photos just don't do this paper justice! I hope they'll inspired you to create some home decor of your own!

Thank you so much for stopping by... please leave a comment, we love hearing your thoughts and ideas!

Big Hugs!
Yvonne


Monday, August 5, 2013

Flower Canvas offered again for Friday August 23, 2013...at 10:30am

Hi everyone:

I have offered my Flower Canvas class again to be held on Friday August 23, at 10:30am. This is a technique laden class where you will mist on canvas, paste emboss on a die cut, and mold cardstock flowers with a bone folder.  All displayed on a cute canvas wall hanging. Stop by the store and check out the sample. 


Flower Canvas
Friday
Aug 23 10:30am
$15.00
w/Pat

Sunday, August 4, 2013

Donna Downey is coming to Scrapdoodles this October!


We are thrilled to announce that Donna Downey is coming back to Scrapdoodles the weekend of October 4, 5, and 6th!  Donna will teaching all new workshops for us!

Donna's weekend with us includes her amazing classes, an opportunity to buy exclusive product and an inspiring weekend with one of the industries most talented artists!

To register, payment must be made in full.*  Registration opens at noon on Monday, August 5. We will not accept any registrations before that time. 


registration is open at 

Noon on Monday, August 5!

540.548.3788

Here is her itinerary:

Friday, October 4
~ 5pm-9:00pm Abstract Painting  NEW! 
Saturday, October 5th
~10am-12:30pm Mixed Media Academy - (part 1) NEW! 
~12:30pm-1:30pm Lunch
~ 1:30pm-4pm Mixed Media Academy - (part 2)
~ 6:00pm-9:00pm Watercolor Whimsy NEW!
Sunday, October 6th
~ 9:30am-12pm PanPastel (part 1) NEW! 
~ 12pm-1:00pm Lunch
~ 1:00pm-3:30pm PanPastel (part 2)

Please see below for class descriptions with project pictures, pricing and including a detailed list of student supplies needed.
*Due to the limited amount of class space and high demand there will be no refunds.

We have in stock or will have in stock the requested supplies. Inventory is arriving weekly!


****************************************************************************

ABSTRACT PAINTING WORKSHOP
Art mini series (3 canvases)

4-5 HOUR WORKSHOP
Friday, October 4~ 5pm-9:00pm 
Fee: $90

Paint looser, bolder, freer, lighter and more intuitively. This workshop is an experience you will want to share. This intuitive painting workshop is designed for the beginner or those who wish to expand upon their existing skills. Versatile, fast-drying and easy to clean-up, acrylics are ideal for busy people who want to learn to paint. Discover your own style while as we explore experimental mark-making, painting and faux encaustic painting techniques to push your creativity and skills to a new level. Discover new approaches to creating expressive abstract art pieces to create your own mini series of art. Learn how to incorporate washes, layering, glazing and texturing as well as integrating color combinations and various methods of applying paint (besides brushes). There are no rules or mistakes in this workshop - just pure fun.

Supplies in kit:
• 8x8 (1)
• 8x10 (2)
• 8 oz. pouring medium
• 1” flat wash brush
• palette knife
• spray bottle (1)
• charcoal pencil

Shared class supplies:
• italic lettering guide stencils (6)
• Acrylic Glazing Liquid (Satin)
• Stencils: (2 each)
1. 12 x 12 Tiny Circles Stencil Template
2. 6 x 6 Tiny Circles Stencil Template
3. 6x6 dinas paint lids template
4. 6”x6” floral stencil (donna downey)
5. 6”x6” random dots stencil (donna downey)
6. 12x12 template – ledger
7. 6 x 6 template - Chickenwire Reversed
8. 6 x 6 template - art is
9. 6 x 6 template - circle explosion
10. 6 x 6 hollyhocks stencil

Students need to bring:
• Favorite acrylic paints in colors you want to work in 
- (I recommend Golden fluid acrylic paints but they are not required)
- suggestion: brown & black in addition to favorite
colors
• white gesso
• molding paste
• objects to make impressions – for example: lids/caps, cookie cutters, glass jars etc. we will use these
to press into wet layer of pouring medium
• heat gun & extension cord
• baby wipes and towel
• water container for brush
• apron


****************************************************************************


MIXED-MEDIA ACADEMY
Mixed-Media/Collage Book

5 HOUR WORKSHOP
Saturday, October 5th
~ 10am-12:30pm
~12:30pm-1:30pm Lunch
~ 1:30pm-4pm 
Fee: $100

Join me in this workshop where you WILL get your hands dirty as you learn start-to-finish how to create
layered mixed-media/collage books in a signature donna downey style. Explore techniques for creating
embedded backgrounds, building a mixed-media color palette (using acrylic paints, oil pastels& india ink), adding dimensional design and texture, blending fabrics, papers, images and a simple bit of bookbinding
to create a unique book from scratch giving your finished piece a uniform look. This workshop also provides you with your own basic tool kit to get you started working in mixed-media and collage.

Supplies in kit:
• turquoise ArtBin
• six – 6 x 9” cardboard
• alphabet stickers
• black india ink
• one oil pastel (any brand)
• one 1 oz bottle of GOLDEN fluid acrylic paint
• spray bottle
• two 2 part tag
• 4 x 6 index card divider
• coin envelope (3 3/8 x 6”)
• coin envelope (2 1/2 x 4 1/4”)
• one roll of bazzill washi tape
• book binding linen thread 20”
• 4 pages of book text
• 36” length of joint tape
• palette knife

Shared class supplies:
• book binding needles
• heavy duty paper awl
• need 8 sets of each stencil
• 6x6 stencil “art is”
• 6x6 stencil “Turkish grunge”
• 6x6 stencil “random dot”
• 6x6 stencil “chevron grunge"

Students need to bring:
• regular gel matte
• moulding paste
• black acrylic paint (recommended GOLDEN
carbon black fluid acrylic)
• enough fabric to make 6 strips of 3 x 9.5” strips (this can be a mix of fabrics or one
design and will be used for binding along the spine of your finished book. This is a great
way to personalize your book!)
• 1” paintbrush
• white gesso
• water cup for brush
• acrylic paint colors (optional: set colors will be provided, but if you want more color options
bring a few of your favorites)
• adhesive (recommend Helmar 450 Quick Dry)
• towel and/or baby wipes
• heat tool and extension cord
• photos (family or mixed media images)
• scissors


****************************************************************************


Watercolor Whimsy
using Gelatos & watercolor pencils

3 Hour Workshop
Saturday, October 5th
~ 6:00pm-9:00pm
Fee: $60


Learn the fun of painting with watercolors in this workshop and discover the vast range and flexibility of
this media. Play with color as you learn how to mix palettes to put emotion and conviction into your
painting by exploring, experimenting and developing your creativity as an individual. This workshop puts
fun into the process of painting, along with enthusiasm and new techniques in an atmosphere that makes
the beginning as well as the practiced painter feel welcome! I will demonstrate with detailed explanations of all the “hows” and “whys” followed by individual attention to see that each student understands and feels successful. Come one, come all to this workshop, no drawing skills are needed! (Your choice of subject of the “she girl” or “Eiffel Tower” will be provided, however feel free to bring an image of your own if you would rather. Remember that image will transfer in reverse so flip the image if needed before you print it. 

Supplies in kit:
• 11 x 14 canvas board
• each student needs Gelatos Mist Maker Kit
• 6 well palette
• black and white image (she face printed backwards)
• black and white Eiffel Tower collage (printed backwards)

Shared class supplies:
• full range of gelatos (1 set for every 4-5 students)
• full range of watercolor pencils
(1 set for every 4-5 students)
• “imperfection is beauty” stamp sets
(1 set for every 4-5 students)
• “art is” 12 x 12 stencil (10)

Students need to bring:
• black stazon ink pad
• medium (1/2” or smaller flat/wash) & large (1” flat/wash) paintbrush
• baby wipes
• heat gun & extension cord
• Golden regular gel matte
• spray bottle for water
• water cup for brushes
• Liquitex matte varnish (totally optional.
This is a finishing spray to apply to your
finished piece)

****************************************************************************


PanPastel Painting
Explore the Artist within in a whole NEW way

5 Hour Class
Sunday, October 6
~ 9:30am-12pm  
~ 12pm-1:00pm Lunch
~ 1:00pm-3:30pm  

Whether you are currently using PanPastels, or have just begun to think about doing so, this class will teach
you a few tricks. All you need is a desire to create and play and you’ll leave with a beautiful finished
painting ready to be displayed. Students will learn about PanPastel ready surfaces and mediums, explore
basic sketching and image transfer techniques, color blending, building shape, sofft tools and application
of PanPastel color as I demo all my favorite tools and products and tell you why I love them. Samples of
my PanPastel art will be provided to use as a models, as well as demonstration on how to sketch, draw and
transform simple designs into dynamic and colorful pieces of art. Ask any questions about what materials
and methods i use throughout the day as I help you build your own unique PanPastel paintings. no previous
PanPastel experience is required.

Supplies in kit:
• (3) Pastel Boards
• (7) PanPastel Colors that include....
• Magenta Ex Dark
• Magenta
• Orange
• Neutral Grey Shade
• Perm. Green Shade
• Bt Yell. Green Shade
• Yellow Ochre
• Palette Tray & Cover
• Sofft® Painting Knife
• (2) Sofft® Knife Covers
• Sofft Sponge Bar
• Sofft Angle Slice Sponge
• (2) Inspirational Images

Shared class supplies:
• Assorted PanPastel Colors

Students need to bring:
• Apron
• Workable Fixative
• Paper Towel
• Baby Wipes
• Inspirational Image - Optional