Pages

Thursday, June 28, 2012

Employee Favorite Product of the Week!

My favorite, can't live without product, is double sided tape. I use it on all my projects. It comes on a roll and you just rip off the amount you need. It also comes in a variety of widths from 1/8 of an inch to 1 1/2 inches. It is super strong and once you stick it down, it isn't coming back up. I love to use ribbon on my projects and it is perfect for that. Just lay a strip of tape where you want it, take the paper backing off and apply your ribbon. Glitter, micro beads and flock adhere brilliantly to double sided tape and there is no mess! I used it under my ribbon and also to assemble my little rosette. I also used a strip of tape and then sprinkled on some glitter to jazz up my card a little. We sell a variety of double sided tape including American Crafts This to That tape and Scor-Tape. Stop by Scrapdoodles this week and pick some up for yourself!


Dawn

Wednesday, June 27, 2012

Design Team Wednesday

 Hello and happy Wednesday!
This is Becky checking in with this week's Design Team Wednesday Projects :)
When I picked up my product from the store this week for my projects, I immediately grabbed for some of the October Afternoon 9 to 5 collection. I love all of those papers with the cute office themes and the adorable typewriter diecuts. When i got home and spread all of my goodies out on my desk I ran into a slight problem...I don't work outside the home; what on earth am I going to scrapbook with a secretary themed line? It took some brainstorming to figure out how I was going to use this fun line (that's why this blog post is going up so late today; I literally finished the last bits of my layouts 5 minutes ago.) but I think what I came up with works really well for me and is a good example of how to use products when the "themes" don't really go with your pictures (or life in general for that matter!)

On this layout i used the yummy woodgrain pattern for my background with some Mister Huey's Calico White Mist splatter (i was a little splatter happy today, all three of my layouts have some!) I cut the argyle pattern right out of the patterned paper and stitched over the dotted lines with my sewing machine. I made the title in my Silhouette Studio and cut it out with my Cameo.


This layout took the longest with that long hand stitched title, but i got to sit outside on my patio while i stitched so the time was definitely not wasted :)
I started with a kraft background and splattered some Mister Huey's Mist in Calico White and Custard. I stitched my title. All of little flags on the picture and the little title strip are from the 8x8 paper pad. love all of the sized down patterns.

I got to use my Silhouette Cameo again for this layout. I cut the hexagon background out of that same woodgrain and cut it apart into a few strips. I cut out extra hexagons to go in the inside out of some of the patterns from the 8x8 paper pad and popped some of them up on dimensional adhesive. I layered some patterned paper and some of the bits and pieces from the 9 to 5 Miscellany pack around my picture. To finish up i added some computer generated journaling to my tag  :)

So that's it for my projects this week, hope you enjoyed them!
I highly encourage you to pick up some of this fun line, there's so much you can do with these pretty patterns (even if you're like me and don't have anything office-y to scrap!)
Have a good one!

New from Little Yellow Bicycle "Escape"!

Come on ... adventure awaits!

And wherever your journeys take you, Little Yellow Bicycle's Escape collection will travel with you in style, with a flair for adventure and a focus on fun!

So point your compass toward excitement and get ready to explore ... The Escape!

Tuesday, June 26, 2012

New from Queen & Company!


Check out all the lovely Washi Tape and Twine that we have in stock from Queen & Co!  

Monday, June 25, 2012

New from Jenni Bowlin!!!


Wren by Jenni Bowlin - Soft vintage colors and feel, accented with beautiful blues and reds make this line a perfect one for summer themes.


Thursday, June 21, 2012

Employee Favorite Product of the Week!


Oh Mister Huey, How I Love You! 

Mister Huey is an opaque color mist spray that comes in a rainbow of colors.  They are great for adding that extra bit of funky flair to your pages.  You can spray it to get a full wash of color, you can drip it (like I did on my Peter Pan layout), you can use it to change the color of an embellishment (check out my wood star that's now yellow, or my Mickey head that's now red), or you can use a mask and create your own background papers.  I love the versatility of Mister Huey and you will, too.  
Come on by the store this week and check them out.  Lori 

Wednesday, June 20, 2012

Design Team Wednesday: Patriotic Picnic by Karen

I must admit I find it hard to limit myself when it comes to all the patriotic papers and embellishments put out every year by paper companies.  I just love the July 4th celebrations with all the picnics, grilling out, hanging out with family and friends, burgers and brats and hotdogs, and of course the fireworks!  Right now at Scrapdoodles you can find several awesome lines of patriotic papers and embellishments.  It was hard to choose, but I took home several sheets of double sided papers and some of the layered chipboard elements from We R Memory Keepers "Red, White & Blue" line as well as a few sheets (I couldn't resist the kraft) of papers from Pebbles' "Let Freedom Ring" line.  To complement these papers, I also chose a sheet of tiny letters and phrases made by Authentique ("Glory").  What did I make with all these goodies?  LOTS!  Take a look!

First - a layout with little "Super Hannah" celebrating the hero in her life - her daddy.  I love these papers for a Father's Day layout!   I cut out some of the paper elements to create the two tags at the bottom and part of the title.  The tag and star circles are some of the coordinating layered chipboard.

Next I decided on a few projects to decorate our July 4th picnic table.  These projects were pretty easy to put together and really make your table stand out from the crowd.  I framed the Pledge of Allegiance 12x12 print (by Pebbles) (after adding just a bit of red stickles and a few confetti stars), then added the embellishments to the outside of the frame.  The firecracker element is simply a rolled bit of paper with shiny streamers glued into the roll.  For the embellishment in the upper left corner, I started with a 12 inch strip of paper that included the bar strip area to get the striped edge.  It's then just an accordion fold, spread open like a fan and glued onto a half circle on the back.  The tag is a layered chipboard embellishment and the "Let Freedom Ring" flag is, again, part of the barcode of the Pebbles paper wrapped around a toothpick and notched.  Speaking of flags, you can buy them already made by We R Memory Keepers, or go ahead and make your own, like I did, with paper scraps.  I also added some stitching and a few extras to this set of flags.  They are fun to make and a little addicting. You can use them on cupcakes or other desserts or anywhere that needs an extra little "hooray!"


But, wait! There's more!  I made a patriotic centerpiece with the papers by making accordion fold stars and medallions and adding various embellishments.  I added little flags with some of the words from the Authentique sticker sheet.  The "Honor" embellishment is one of the large layered chipboard elements from We R Memory Keepers.  I like how it stands out in my "bouquet."  I rounded off the centerpiece with some ribbons and paper strips curled around a skewer.

Last, but certainly not least, I decided to dress up some plain condiment containers with more paper strips, a few tags (cut from the paper sheets) and ribbon.  I love how everything turned out and can't wait to celebrate our country in just a couple weeks.  Come in the store (it's air-conditioned!) to see the projects in person  and check out the large selection of July 4th and summer papers and embellishments.  Show us how you craft up a Happy Birthday, America!
 

Tuesday, June 19, 2012

Classes for Kids!

Over the next few months,  we will be holding special classes especially for kids!  We are excited and our teachers are busy coming up with some great summertime projects just for them.

Our first class espcially for kids is next Wednesday, June 27th at 10:30am. We will be making tie-dye firworks t-shirts just in time for the 4th of July!  Here is a peek at our project:


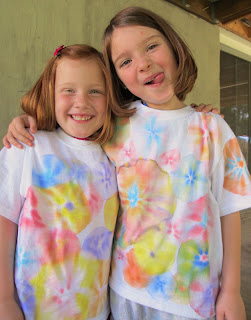
And here is what your kids' shirts will turn out like:


Lol!  My girls' couldn't stop at just a row of fireworks! :)  They had so much fun with this project!

This class is geared towards kids of all ages and will only take about an hour to finish.  Here is the information:

Fireworks Tie-Dye Class with Tessa
Wednesday, June 27, 2012
10:30am
$8.00
Please bring your own white t-shirt to dye

We are really excited about our kids class series and hope your little ones will be able to join us for some fun!  If you have any questions or would like to sign up for a class, please call our store at (540) 548-3788.

Have a great day!

Pick Your Kit!


We are excited to announce our new take on the kit clubs that are so popular right now- Pick your Kit! We've put everything together - fun papers from our favorite lines, cardstock to match, and great embellishments that you may not have thought of - for you to pick and choose out of. No need to subscribe- we'll have a new kit every month!

Look for our new Pick your Kit rack near the entrance of the store!

Monday, June 18, 2012

Liberty Banner Class

Hello there!

I'm posting a little late but still wanted to share my banner that we will be making in class on Saturday!  I thought it would be in perfect time for the 4th:


I know the picture isn't the best but at least you can get an idea of the project we are making.  I've mixed lots of fun collections and created some great handmade embellishments that I'm sure you will love!  I hope you can join me for class- here are the details:

Liberty Banner Class
with Tessa

Saturday, June 23rd, 2012
at 10:30am
$24.00

Please bring adhesive, scissors, trimmer, crop-a-dile (if you have one), and if you like to use them to cut around chipboard, bring an exacto knife and glass mat.

Kits are also available and will be at the store on the 23rd for pick up.

Please call down during store hours to sign up- our phone number is (540) 548-3788.

Thanks for stopping by the blog today!

-tessa

Thursday, June 14, 2012

Design Team Wednesday: Cyndi Michener

Happy hump day! For some time I've been wanting to do a layout about the 13 states I have never visited, but I didn't have any photos to go with that theme. The combination of Studio Calico's states-themed paper from the Abroad line and Silhouette's USA map die cut inspired me to go ahead and do a photo-free page. Everything else on this page is from We R Memory Keepers' Red White & Blue line--it's not just for the 4th of July! (I designed the title myself...so easy with the Silhouette Studio software.)


And of course October Afternoon's 9 to 5 collection was perfect for documenting my new (where has six months gone??) job. Could the ledger background be any more perfect for my accounting job? I love the whimsical retro-ness of 9 to 5.

 
 When October Afternoon's Sasparilla collection came out, I knew I'd need it all to document the many trail rides my husband and kids have taken on our vacations. One of my favorite things about October Afternoon is how easily their lines mix and match. The wood-grained paper I used for the title is actually part of 9 to 5.


Employee Favorite Product of the Week!


DIY Thickers!!!

I love the DIY Thickers because I can make them any color/texture that I want! Glitter, tinsel, chunky glitter, micro beads, and even flock or colored with Copics!!! The best part is if I run out of a letter I can just buy a new set! No more leftovers of TONS of colors – just make the letters you need!!!

Michele

Wednesday, June 13, 2012

Wednesday, June 6, 2012

Design Team Wednesday

Summertime is here! Time for vacation! Time to head to the beach. Creative Imaginations has a beautiful beach line that I could not resist. For all three projects I used only three sheets of paper!

The mini album is from Bo Bunny. The sand is from Mudpuddles and it's real. Super cool! For the last page I used a new paper from Creative Imaginations. You can paint it, ink it, or mist it. I did all three to the paper.

Come by the store and get a closer look at all of the projects. The girls at the store will be happy to show you them and the products I used.

Sorry so short this month, but we are on our way to Florida in two days. It's crazy around here. We are going to the happiest place in the world, Disney!! So guess what next months projects from me will be?! I can't wait to show you them.

See you next month!

~Tiffany

Monday, June 4, 2012

Jenni Bowlin Pocket & Tag Album at Scrapdoodles

Jenni Bowlin is attending GASC June 22 & 23 but is not going to be teaching at GASC. She is, however, stopping at Scrapdoodles on her way up to teach this fabulous Pocket & Tag Class. We need a minimum amount of students, so don't delay. Call the store at 540-548-3788 to register.

Come join us Wednesday, June 20 as we welcome back Jenni Bowlin! She will be teaching this adorable library card mini album. Jenni is a favorite at our store and we are thrilled that she is coming back!


From Jenni - I have been a lover and collector of all things old, worn and tattered for as long as I can remember. There is something about the story that each item has to tell that draws me to it - the who, what and when. It is no surprise that I found my way to scrapbooking more than 10 years ago, and eventually to launching Jenni Bowlin Studio in 2007.

Vintage can be found in everything we do. From paper to embellishments you are sure to find hints of old feedsack fabric or antique typography, but with a modern twist! We call it "Fresh Vintage" - a style uniquely our own.

For more on Jenni, please go to her BLOG.


Pocket and Tag Album Class-


When I was a little girl I used to play library. I was fascinated with stamping the cards and fitting them into their pockets neatly in the back of the books. I still love the idea of pockets with embellished tags and cards tucked safely inside and have created an album for this class that connects several of my newest JBS pockets and tags together, embellished with my clear stamps and Ranger inks (and my new line of punches from Fiskars)!

Date: Wednesday, June 20
Time: 6:30pm-8:30pm
Fee: $42.00

Supply List -


- Basic Supplies (paper trimmer, ruler, scissors, craft knife and mat, etc. . .)
- Various adhesives (such as a tape runner, Glossy Accents, glue dots and pop dots).
- Baby Wipes
- Paper piercer and needle
- Small stapler
- Crop-o-dile (or other hole punching tool)
- Ranger Blending Tool (if you have one. Several will be provided for class use)

Cameo 101 - The Basics!

Hi everyone!

Heather here!  Just wanted to get the word out that there will be a Cameo 101 - Basics class this coming Sunday, June 10, at 1:00pm.  For those of you who've been wanting to take the Basics class, this is the last time I will be teaching it until mid-August, so now's your chance!  You will learn the bare bones of how your Cameo works and what makes it tick.  We will also review the Silhouette Studio software (free download from the Silhouette website).

Have an original Silhouette or SD instead of the Cameo?  No worries - you'll get a lot out of this class, too!

Fee:  $12 if you've bought your Cameo from Scrapdoodles, $18 if you've bought it elsewhere.
Supplies needed:  Note-taking materials, laptop with Silhouette Studio installed (laptop is recommended, but entirely optional)